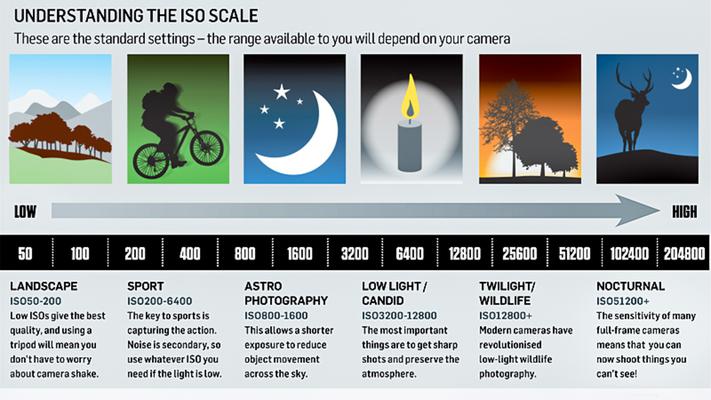
Cheat sheet: How to understand ISO settings
The ability to adjust your camera's sensitivity (ISO) is one of the great advantages of digital capture.
Changing your ISO setting means that you can tailor the camera to various situations. Doing so will help you to end up with an image that's sharp and appropriately exposed, whatever the environment.
What ISO setting should you use?
As a general rule you want to stick to the lowest ISO possible, as this will give you the cleanest images. This is easy in good lighting conditions as your camera doesn't need a very high ISO setting in order to capture the image. So, if there's plenty of light in the scene, you can use a setting such as ISO 100 or 200.
When shooting in trickier conditions, you may need to raise this ISO, perhaps to ISO 1600 or 3200 – or maybe even higher. Doing this will give you a faster shutter speed to work with, which in turn helps you to end up with a sharp image.
Image noise, however, is likely to be more visible. This gives images a colored, grainy texture, and it can obscure details, so you really want to keep this to a minimum.
See also
What is ISO?
If you're using your camera on a tripod, you can use lower ISO setting than you would normally be able to, which will help with the quality of your images. This is because the camera is not subject to any movement during the exposure as it's not being held by the user, which makes longer shutter speeds practical.
To give an example, an sensitivity of ISO 100 may require a shutter speed of three of four seconds in a particular situation. This is too long to be useful when hand-holding the camera; the result will be a blurry image.
On a tripod, however, you can use this kind of ISO and shutter speed in the knowledge that the camera won't move at all during the exposure. This is great as it allows you to record moving subjects, such as flowing water or traffic, with a pleasing blur.
Read more:
Three key lessons for every new photographer

Today's cameras allow you to select an Auto ISO option. This allows the camera to choose the best ISO for a particular situation, basing its decision on your lens and the shooting conditions, and conveniently alter this from frame to frame.
There may be times, however, when you want to overrule this, perhaps for creative reasons. So, it's good to understand what's happening.
Save our cheat sheet and make sure you ever get stuck with ISO again!
Click the top-right-hand corner to enlarge image
Read more
• More
photography cheat sheets
• More
photography tips
Related articles
Google Pixel 6: latest Google Camera app hints at upcoming phone specs & features
FREE guides with Digital Photographer magazine 242!
Got $6,000? You can buy this iPhone 12 Pro that smells of coffee
Is Olympus throwing away its biggest advantage?
